Message in a Bottle Invites ~ our cute little wedding invites
Don't forget to stop by and Like my Facebook Page! DIY Vintage Chic.
With our small destination wedding planned I knew I wanted to do something very cute for our invites. There's not very much about us or our wedding that's traditional so with only20 invites... 25 invites... ok, eventually it was 30 invites going out in the mail, why not be a little creative? The general idea for our wedding: Stress FREE! Yes, I know the fun part for me would be creating escort cards out of sand dollars, menus glued to handmade fans, homemade candles in giant seashells for center pieces... but it would also stress me to no end. But with a destination wedding there's no need for all that. So, that means more budget for the invites!
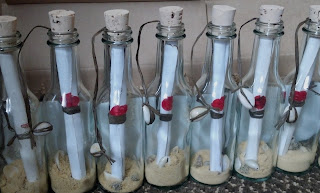 I had been toying with the idea of Message in a Bottle invites so I decided on Vintage Travel as my theme. Seemed fitting for me and for our destination wedding.
I found my bottles on The Original Message in a Bottle Shop. They also sell the corks and boxes for these bottles. If you decide to go this route for your invitations, do a little research. Depending on the size, quantity and your location, you may be able to find a better price {don't forget to check out their shipping charges!}. But for $1.25 a set, it's a pretty good deal! You can also purchase the sand, paper, seashells, heck they'll design the whole thing for you!
While those were on order I started on the design. I wanted something that looked old and worn. I settled on a few Photoshop backgrounds and filters and eventually was satisfied with the outcome.
 Of course I couldn't just print them out and be done. They'd look too clean cut. So I tore each of the edges and then made my fiance do at least a little work. Here's your chance ladies. If you want your man to help out with the invites just tell them you need help playing with fire. They'll be there. ;)
Now I was ready to roll them up. During some testing I ran into the problem with rolling the paper up and shoving them in the bottle, then struggling to get them back out. I didn't want our guest to struggle since there would be sand in the bottom. So I used some rubber bands to help me out at first.
I tied raffia around the middle of the invites and made sure it was long enough to come up out of the bottle and hang outside. At the end of the raffia I tied on seashells for a little bit of extra grip.
 Next, more playing with fire! I saw these wax kits at the craft store one day and thought they would look perfect. What else screams vintage like a wax seal with your soon-to-be initial?
 But it's a tedious process, especially on a circular object.
 Take a few practice rounds before actually starting on your invites... trust me.
 Next up, fill those bottles. Since about 2/3 of our invites were going to be mailed {we hand delivered quite a few to cut cost} I tried to keep the shipping cost low. If you're not planning to ship yours use as much sand and seashells as you like. I kept my bottles to 1/2-1 inch of sand and dropped a few seashells into each. Also, add a little ocean scent to your bottles. I grabbed a small jar of oil and used a couple of drops in each bottle. Your guest should catch a whiff when they uncork the bottle.
 Insert the invites into the bottle with your ribbon sitting below your wax seal. This way when your guest pulls on the ribbon it will catch on the seal and not just slip off.
 What about all that extra info you usually receive with wedding invites? I couldn't just have pieces of paper lying around in the box. So I created a "Passport". Our little booklet contain everything from a personal note from us to the resort and travel agent info.
 Our resort was also kind enough to email one of their stock photos so I created a postcard for the Response Cards.... vintage looking of course.
Finally I boxed those suckers up with a little stuffing inside.
 Wrapped them in Kraft paper and shipped them out. The price for shipping you ask? About $3.00 for each. Not too bad!
 Stay tuned. I'm hoping to have a beautiful, unique bouquet to show soon too! And this one won't wilt and die. :) {Update: See the bouquet here}
Thanks for stopping by!

Linking up with:
Nifty Thrifty Things, Funky Junk Interiors, Twiggs Studios, DIY Showoff, I Should Be Mopping the Floor, Craft-O-Maniac, Salt Tree, Knick of Time, Coastal Charm, Not JUST a Housewife, Crafty Confessions, Embracing Change, The Shabby Creek Cottage.
***While I'm thrilled to share my step-by-step directions, the good and the bad, these are intended for your personal use. I'm always happy to hear and see what my bloggers have been working on. BUT a lot of work goes into these creations and while I have no issues sharing so you are able to create the work for your precious homes please understand that selling an exact duplication of my designs is highly frowned upon. :( Please always be considerate of another artists work. Thank you!***
With our small destination wedding planned I knew I wanted to do something very cute for our invites. There's not very much about us or our wedding that's traditional so with only

I found my bottles on The Original Message in a Bottle Shop. They also sell the corks and boxes for these bottles. If you decide to go this route for your invitations, do a little research. Depending on the size, quantity and your location, you may be able to find a better price {don't forget to check out their shipping charges!}. But for $1.25 a set, it's a pretty good deal! You can also purchase the sand, paper, seashells, heck they'll design the whole thing for you!
 |
| You can find bottles in a variety of sizes. Also if you're looking to cut costs, you can purchase plastic bottles which the post office will let you mail as is, no box |

 |
| My little helper |
 |
| I used chopsticks to roll up the invites |


 |
| I'm hoping for a photo of the sunset just like this except with us down in those little gazebos! |


Thanks for stopping by!

Linking up with:
Nifty Thrifty Things, Funky Junk Interiors, Twiggs Studios, DIY Showoff, I Should Be Mopping the Floor, Craft-O-Maniac, Salt Tree, Knick of Time, Coastal Charm, Not JUST a Housewife, Crafty Confessions, Embracing Change, The Shabby Creek Cottage.
***While I'm thrilled to share my step-by-step directions, the good and the bad, these are intended for your personal use. I'm always happy to hear and see what my bloggers have been working on. BUT a lot of work goes into these creations and while I have no issues sharing so you are able to create the work for your precious homes please understand that selling an exact duplication of my designs is highly frowned upon. :( Please always be considerate of another artists work. Thank you!***
Your guests will adore and treasure their invites! If your invites are anything to go by, your wedding will be stunning!
ReplyDeleteWhat a dream destination for a wedding!
Have fun making the bouquet!
Cutest.Invitations.Ever. Seriously, those are just amazing... and I think I may have to renew my vows with a destination spot just to do this. I can't even imagine how thrilled your guests were to open such darling packages. And the passport? Genius!!!
ReplyDeleteReally cute! I did some invites in a bottle but these are cuter. Will you please share at swtboutique.blogspot.com? Great job.
ReplyDeleteStephanie
This is such a creative fabulous invite idea!! I love it. Come link up to Centerpiece Wednesday and share this idea and enter my giveaway too.
ReplyDeleteKarin
Hello,
ReplyDeleteThose turned out awesome as the owner of The Original Message in a Bottle Shop, I am thrilled to see how your bottles turned out.
Well done.
Keith C
http://www.bottlemeamessage.com
Hi Becca,
ReplyDeleteJust wanted to let you know I am featuring your message in bottle tonight on Super Sweet Sunday.
Thanks for linking up.
Stephanie
swtboutique@hotmail.com
Very original and fun!
ReplyDeleteGood luck on your special day!
Thanks for linking up this week!
Stacey of Embracing Change
I threw a pirate party years ago for my son, and this is how I sent the invites for his party. Although, the bottle" was plastic and I addressed it and put postage directly on the bottle. This is an adorable wedding invite...
ReplyDeleteHow does that work? Do the people at the post office get mad about it since it's not traditional shipping? And about what did it cost per bottle?
DeleteThis is wonderful! I'm doing a coastal beach theme for my son's bday, and this is how we are doing invites, but I think I'm going to get plastic bottles and send them without the box... since I don't need as much info on them.
ReplyDeleteI love it! How did you create the passports? (I can't imagine hand trimming all those corners) Do you have any tips?
ReplyDeleteLeah ~ I designed and printed out the passport pages. Then I went through and cut off the edges with an xacto knife. I purchased a corner punch to round the corners. You can find them at most craft stores in their scrapbook section. Here's a link to the one I purchased from Hobby Lobby. http://shop.hobbylobby.com/products/rounder-crop-a-dile-corner-chomper-652073/
DeleteI love this idea, I did it for my wedding last summer. FYI-- I bought my bottles & corks at a better price on www.onlinebottles.com
ReplyDeleteThe website was easy to use and great customer service! (I had a million questions!!)
Good luck!
Thanks for the advice Rachel. I checked out the website but didn't see an where you could order boxes for mailing the bottles. The total price would be a better deal if includes the shipping boxes too.
DeleteI had a follower Sammie send me a message with some questions. I tried to respond but your email address is bouncing back my message. Please email me at diy-vintage-chic@outlook.com
ReplyDeleteCan you please e-mail me the passport templates?! I absolutely love them!!!
Deleteagathe070@gmail.com
Thank you!!
Very Gorgeous gift
ReplyDeleteThank you for valuable
Outsourcing Company India
Ostentatious invites!!!! guest will really impressed with such kind of creative bottle wedding invites. and i am going to follow this idea for next winter wedding. really remarkable!!!!!
ReplyDeleteHello Becca! These are amazing...
ReplyDeleteIs there any way I could use your Passport template? (With proper crediting, of course)
Im part a committee that's throwing an event in a couple months. It has a "traveling" theme, and we are utilizing passports in the overall event. Thank you in advance for your consideration!